New 1st Army "How to"
I used one of my custom head (06). 使用自製的頭雕.

I used one of my custom Asian head, fill up the silicon to the neck joint then apply putty and fix it by sand paper. Mr.Hobby light gray mix orange as primer.在脖子填進熱熔膠, 再以補土鋪上表面, 這部位也固定住了! Mr.Hobby 壓克力漆打底色.

Oil paint for the skin tone effect, the DID boot had been worn naturally that it still need to paint it black as accuracy. Eventually, the boot will bury in the water.
油畫顏料處理皮膚色調. DID 美軍短靴, 皮的部位都已經裂了, 還好是用來埋進水裡, 無仿! 還是得塗上黑色才正確.

I used 5.0mm tape as legging that needs dye.
3.5mm織帶染色, 打上小腿.

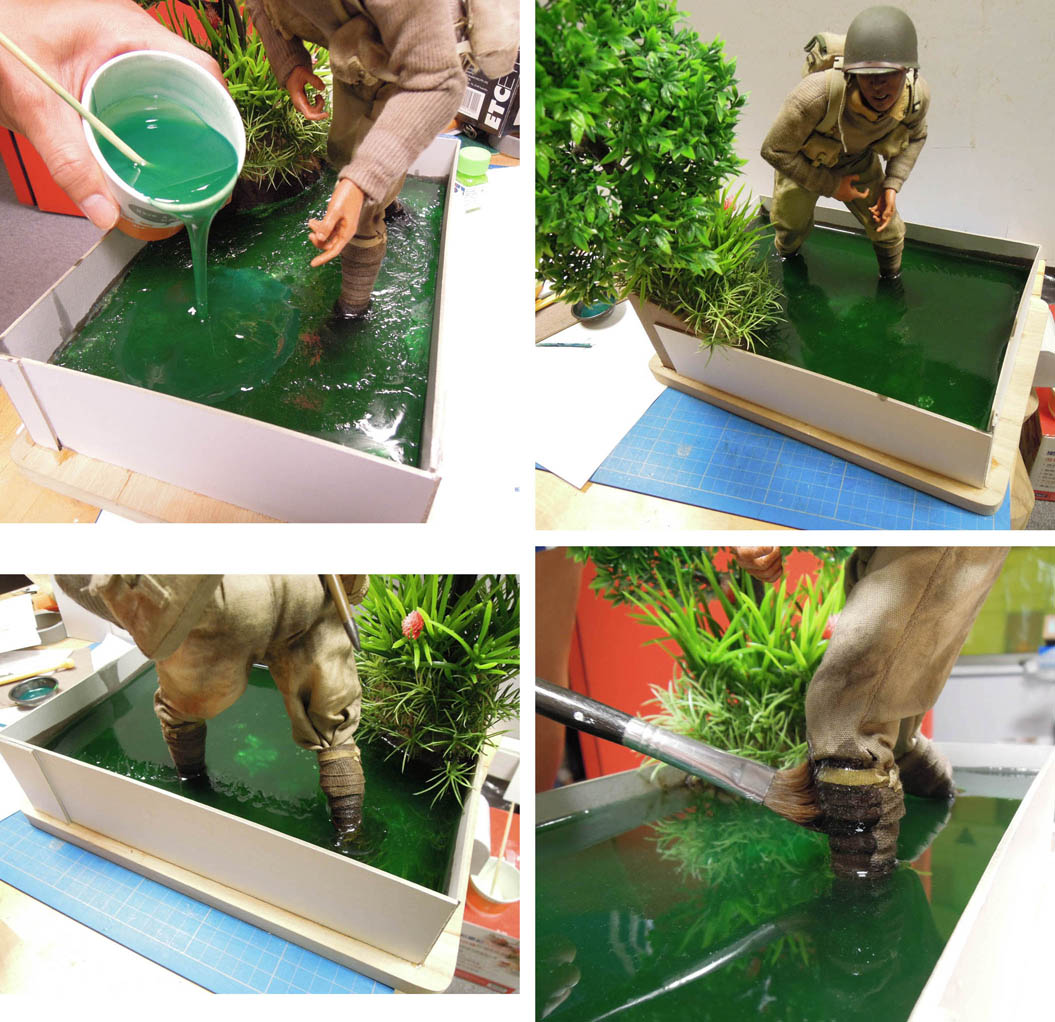
The rest of soldier making of were not much particular, that straight to base making; I curve the notches on the board surface that can be hold the resin tightly.兵偶其餘部位就沒啥好敘述, 直接跳到地台製作; 將板子底部刮成凹槽可以牢牢地抓住清樹脂. 角落留塊小土堆來表示這士兵是沿著河岸搜索日軍. 小土堆作法跟以前一樣.

I spend most of time for the first try bush making, which I’ve brought bunch of plastic branches for the bush that was exciting subject to for it; I made the bush shape with wires then wrap the putty on it, that I roughly curve the surface while putty dry.這次樹叢的作法是第一次嘗試, 鐵絲包補土, 在表面以美工刀大略削過, 上色!

Figure it out the branches is not enough while the bush had completed; in order to looks dense that I’ve add more plastic rod on the bush which I stick the plastic rod with super glue then apply the putty at the joint area. The plastic rods bend the shape with lighter.
完成後發覺樹幹太少!! 要是加上樹葉就會呈現太稀疏的感覺, 不好看! 在樹幹上鑽洞後以塑膠棒黏上, 在黏上之前得以打火機將直的膠棒烤彎再接上分枝.

Place the bald bush onto the mound; that I pick two type of plastic vegetation and glue onto the mound. Each branch has 3 plastic leaves.
固定上樹叢後在土堆上種植物(塑膠草), 兩種樣式的塑膠草; 將樹葉插進樹幹, 每隻樹幹約有3 個樹葉叢, 盡可能讓樹叢顯得茂密!


TAMIYA enamel X-23 + X-15 mix with clean resin (A) then mixes the hardener (B). Settle the figure in the right place, then pouring in the resin which the cardboard paper had block the side.
倒入環氧樹脂, 環氧樹脂為AB 兩劑混合的方式作業, 比例為1:3; 但是這比例顯然不準, 因為在完成後有部分層次未乾! 真輒騰!! 水的顏色則是倒入調色後稀釋的顏料再攪拌均勻. 在倒入第一層時要兵偶固定, 也就是固定住兵偶, 讓環氧樹脂乾硬後就固定住了,接著往上倒入, 到最上層順便以筆刷沾上樹脂刷上有可能沾到水的部位.

Pouring the coloring resin layer by layer into the base, the top layer of resin needs to make water wave to show the water direction; the ripple is nasty parts that needs to handle well before it dry.
一層一層倒入到容器裡, 在最上層快乾時得做出水紋來表示水面的流向; 白色的水波也是在樹脂快乾前必須處裡的部分.
Tear the cardboard paper off then clean the
resin parts; I add a rock on the water and come up with the ripple that will
looks a bit fun for the layout.將厚紙板撕掉, 讓透明部位出現. 在水面加了顆小石子來增加水面的豐富性及水紋的方向.

Comments